Farewell parameter var

In Swift 3.0, the var keyword in function parameters is being removed. Apparently there was too much confusion of var parameters with the functionality of inout parameters. For more information, see the Swift blog announcementSwift Evolution proposal and swift-evolution-announce post.

If you had function parameters set as vars in your code, this can be a bit of a pain.

I for example had an extension of UIColor that initialized a UIColor with a hex parameter var:

extension UIColor {
    /// A hex must be either 7 or 9 characters (#GGRRBBAA)
    convenience init(var hex: String) {
        /// etc...

The hex parameter was set as a var as I modified it in the process of converting it to an RGB Alpha value.

The first instinct might be just to make your function parameter inout:

    convenience init(inout hex: String) {

However if you pass in a literal to an inout parameter, you’ll see a compiler error:

let color = UIColor(hex: "#4EA2FF")

Cannot convert value of type ‘String’ to expected argument type ‘inout String’

That’s not ideal. Best case scenario is no changes to the calls to the function or the function body itself.

To achieve this, all you need to do is remove `var` from your function parameters, and add a first line, passing in the parameter value to a variable:

extension UIColor {
    /// A hex must be either 7 or 9 characters (#GGRRBBAA)
    convenience init(hex: String) {
        var hex = hex
        /// etc...
Tagged with:
Posted in Swift

Create a CocoaPod

In the previous post we created a dynamic framework.

Now we’re going to share this code with the world, by turning it into a CocoaPod and uploading it to cocoapods.org:

Screenshot 2016-02-16 16.13.44.png

First, drag your whole project folder to Terminal, and create a podspec. In Terminal, type:

pod lib create ExampleProjectName

(Replace ‘ExampleProjectName’ with the name of your project, but be sure to give it a different name to your framework project name)

This pod lib create command is like a pod wizard, and will go through a series of questions to customize your pod. Your answers should be Swift, and Yes to include a demo application. The wizard will generate a podspec file and an Xcode project and workspace that you can use to demonstrate how to use your library, and open it up automatically for you. If you want to look for the new Xcode workspace in the Finder, you’ll find it located in ExampleProjectName/Example/ExampleProjectName.xcworkspace.

In the Project Navigator in Xcode, find Podspec Metadata. In here are three files you’ll want to edit:

  1. PExampleProjectName.podspec – This specifies all the details of your CocoaPod, including name, version number, dependencies, minimum requirements etc. The wizard prepulates this file with prefilled details and comments (anything after #) to help you understsand the expectations. Go through this file editing it for your project.
  2. README.md – The README is prepopulated with some explanations of your pod, instructions how to install etc. Feel free to add additional details.
  3. LICENSE – A license for distribution of your code, This defaults to the MIT License, but feel free to edit this.

Now to edit your two projects.

  1. Remove the references of your Swift classes in your dynamic framework project(leave behind ProjectName.h and Info.plist)
  2. Move these classes from your project folder to your new example project, in the Pod/Classes folder.
  3. Drag references to the new locations of your classes back into where they were in the original project in Xcode. (deselect Copy items if needed)
  4. Build your dynamic framework to be sure all is still working properly.
  5. Drag references to the classes into your example project, in the Classes folder.
  6. Remove the ReplaceMe.swift file – you can Move to Trash.
  7. Now to install the pod – drag the Examples folder to the Terminal, and install your pod to your example project:
    pod install
  8. Build your project.
  9. Hooray. You should be able to use your code in the example project! Write some code to demonstrate its use.

Validate your podspec

Now it’s time to check your CocoaPod passes validation. Enter the following into Terminal:

pod spec lint ProjectName.podspec

It should provide you with helpful guidance as to what changes you need to make, if any, to your podspec and files.

If you see the message:

ProjectName passed validation.

you’re good to go! Just one more thing to do.

Update the git tag

Before you upload to CocoaPods, you need to demonstrate that you are describing the same version of the github project in the podspec. To do this you need to give your github project a tag and push up to github.

git tag -a 0.01 -m "First CocoaPod version"
git push --tags

Be sure that your version number matches the s.version number in your podspec.

Upload to CocoaPods

Now finally, we’re ready to upload to CocoaPods!

pod trunk push ProjectName.podspec

Soon you should see your project appear on CocoaPods! You can see my Sprite Kit Easing framework on CocoaPods here.

Install your pod

You should test your pod from a user’s perspective. Create a new Xcode project, and then create a Podfile. Mine looks like:

source 'https://github.com/CocoaPods/Specs.git'
use_frameworks!
platform :ios, '8.0'

pod 'SpriteKitEasingSwift'

Install your CocoaPod:

pod install

You should see your pod install, and a workspace created. Open the workspace and build your project.

You should now be able to access your code. Don’t forget to import your framework:

import SpriteKitEasingSwift

Make changes

Have to make changes to your code? Easy. After making your changes you just need to:

  1. Update version number in the podspec.
  2. Update the git tag and push i (as per above).
  3. Check everything is still valid (as per above).
  4. All good? Upload it to CocoaPods (you guessed it, as per above)
Tagged with: ,
Posted in Swift

Create a dynamic framework for iOS in Swift

Have you ever written some Swift code in iOS that you’ve thought, this could be way useful in other projects? One solution is to set up a Cocoa Touch framework – edit your source code in one place, compile your framework and it is automatically updated in all of your projects. Awesome! We’re going to do just that in this post.

But then perhaps you would like to share this amazing framework with the world? Well, why don’t you make a CocoaPod out of it and upload it to the master repository at cocoapods.org? The next post will turning your framework into a CocoaPod.

Create a Cocoa Touch dynamic framework

First step is to create a Cocoa Touch framework. Previously, developers were only able to create static libraries for iOS – since Xcode 6 we are now able to create dynamic frameworks, a much more straight forward way of creating a framework.

Have you ever been working in SpriteKit and wished you had access to some great easing functions? (think Robert Penner, Greensock, etc) I migrated an old Objective C framework to Swift some time ago that does just that, and I think it’s a great candidate to turn into a dynamic framework and upload to CocoaPods. So join me on the journey! Here are the steps you need to take.

First of all – you’ll need to create a project and select Cocoa Touch Framework. Screenshot 2016-02-10 10.14.34.png

Be sure to select Create Git Repository on My Mac to make it easy to upload this project to Github.

Add the Swift files from the project you want to convert to a framework. You need to convert your classes and functions to have public access.

Now – if you just want to upload the code to CocoaPods, that’s it for building your dynamic framework. If you want to use the built frameworks there’s more to do.

Unfortunately Apple hasn’t yet resolved some issues with Xcode and universal frameworks. The best resource I’ve found for resolving this(until Apple does!) is here. Follow the steps for “Creating a Framework”. The process seems to change every time Apple updates Xcode so make sure you’re reading the latest version of the blog post. It’s a shame we need to go through this laborious process, but that’s how it is for the moment.

If you follow the steps correctly you should have a framework for Debugging and Release in your project’s _Archive folder.

When you’re done, test the framework by following the steps in the same post for “Adding Frameworks to an App.”

When you’re done, push your project up to a repo on Github. You can find my SpriteKitEasingSwift project at this point on Github here.

In the next post, I’m going to upload this repo to CocoaPods.

Tagged with:
Posted in Swift

Looking back on 2015

2015 has been another great year.

Under moniker Interactive Coconut I spent a lot of time working on new app Grabble Words, which launched at the end of the year. Technically Grabble Words delved into new areas such as Sprite Kit, Parse, Notifications  and was my first full app developed entirely in Swift. I’ve made major updates to Subtitles Viewer, and added Subtitles Viewer PRO to the mix.

I’ve written more courses for Thinkful including an Objective C course and am course lead for iOS and Android. This blog has taken off too. I thought it was going well last year, but I’ve had ten times the views this year! I also have a number of interesting apps and projects lined up for 2016. Watch this space!

Here are my more popular posts of 2016:

Parameter defaults and Optional Function Parameters in Swift 2.0 – Updated from an earlier post based on Swift 1, both posts combined are up to 15,000 views!

Func parameters in Swift 2.0 – Also updated from an earlier post. There’s obviously a need out there for info on function parameters in Swift!

Swift API for the Flash Guy – Tutorial based on a framework I built called ActionSwift3 which you can check out on Github or CocoaPods. ActionSwift3 enables you to use some of the familiar AS3 API, but from built on top of what’s called the `SpriteKit` framework, within Swift.

Localization playing nicely with string interpolation in Swift

Multi-line SKLabels in Swift

Check out my related post for 2014 here.

Posted in Swift

How to Invite Facebook Friends to Install Your iOS App

After six months of work, Grabble Words launched this week – hooray!

grabot

But – I’ve just discovered it contains an important bug – inviting Facebook friends to install the app doesn’t work – boo…

It all stemmed from a misunderstanding of the Facebook docs:

App Link URL: App Link for what should be opened when the recipient clicks on the install/play button on the app invite page.

I understood that this should be the URL for the app in the App Store, and assumed that as the App wasn’t yet active on the App Store, it would work as soon as it launched. Turns out the plot is thicker… (I have found there’s often some ambiguity in Facebook docs whether App is referring to iOS App or Facebook App – I will try to be clear about this distinction in this post.)

I have found tutorials on this topic thin on the ground, so here goes:

1. Set up a Facebook App Page.

To invite Facebook friends to install your iOS App, you’ll first need a Facebook App Page. Go to https://developers.facebook.com, create an app and make it public. Be sure to fill out the App Details tab, including Promotional Images. These images will display when inviting a friend to install your iOS App.

2. Set up a custom URL Scheme.

A what now?

Adding a custom URL Scheme to your app is like setting up a URL that will instruct your app to open. Why do we need this? Well if a user receives and clicks on an invitation to install your app, and they already have the app installed, the Facebook invitation should just open up the app directly.

It’s actually pretty easy, you just need to add a couple of items to your info.plist file:

  • In the first item of your URL types property, add an identifier for your app(variously called URL identifierCFBundleURLName) using a reverse DNS style, eg. I’ve called mine com.interactivecoconut.grabblewords.
  • Within the same item, add an array called URL Schemes(or CFBundleURLSchemes), and within that, add an item with whatever word you wish to associate with your app. I’ve used the word grabble.


Here’s what that looks like in the plist file (Note the blue line is the Facebook app id which is also included for connecting to facebook)

Screenshot 2015-12-11 15.37.43.png

Open the info.plist file as source code to get a look at the underlying XML:

Screenshot 2015-12-11 17.22.51.png

Now we’ve set up a custom URL Scheme, build your app on your device. Done! Now, any time this URL Scheme is navigated to – from another app, or even from Safari, your app will open. Try it out – go to Safari and type the following into the URL field: (or the equivalent for the name you assigned to your app)

grabble://

You should find that after selecting return, your app opens! Custom URL Scheme set up. You can use this to pass parameters for deep linking within your app, but we don’t need this for setting up Facebook app invitations.

3. Create an App Link

Now we can set up our App Link, which is not the App Store link to your app! If I had have read on in the Facebook App Invites documentation I would have read a clearer definition of what an App Link is in this context:

The App Links protocol is a cross-platform, open-source protocol for simple mobile deep-linking.

The easiest way to set this up is using the Facebook App Link Quickstart tool.

  1. Select your app. (If you don’t see your app, you’ll need to first add your app to the Facebook Developers page)
  2. Select iOS
  3. Ignore Modify an existing App Link URL?
  4. Create an App Link Name just for yourself.
  5. Select iOS for a Universal App, and iPhone or iPad if your app has different settings for different devices.
  6. Under URL with custom scheme, you want custom URL scheme you set up earlier. Here I put: grabble://
  7. App Name: Straightforward!
  8. App Store ID: This was filled in automatically when you chose your app.
  9. Website Data URL – the easiest web page to add here is your Facebook App Page.

Select Next and Quickstart tool should present you with your App Link! Record this link to use later.

4. Write the code!

Ok, now comes the more familiar stuff – code!

Make your View Controller implement the Facebook App Invite Dialog delegate and add in delegate methods to receive completion handlers:

extension ViewController:FBSDKAppInviteDialogDelegate {
//MARK: FBSDKAppInviteDialogDelegate
func appInviteDialog(appInviteDialog: FBSDKAppInviteDialog!, didCompleteWithResults results: [NSObject : AnyObject]!) {
 print("invitation made")
}
func appInviteDialog(appInviteDialog: FBSDKAppInviteDialog!, didFailWithError error: NSError!) {
 print("error made")
}
}

Great! Now you can request the invitation – you’ll probably want to put it in an IBAction to respond to a button tap for example:

@IBAction func tapInviteFriends(sender: AnyObject) {
 let content = FBSDKAppInviteContent()
 content.appLinkURL = NSURL(string: "https://fb.me/979111111111111")
 FBSDKAppInviteDialog.showFromViewController(self, withContent: content, delegate: self)
}

Too easy! Now when you tap your invitation button, you should see something like:

IMG_0094

Stop press: The new version of Grabble Words is here now – try out inviting your friends, and enjoy! App Store link here.

Tagged with: ,
Posted in Swift

Swift API for the Flash Guy

flashhistory

Flash.

The ‘f’ word. At least it feels like a dirty word right?

Flash really spiralled out of fashion since Steve Jobs’ famous “Thoughts on Flash” open letter five years ago. Wired posted an article last month titled “Flash.Must.Die”, the Facebook security chief called for its termination, the Occupy Flash movement called for us to eliminate it from our browsers, while the big name browsers themselves starting eliminating it for us.

Well known and respected Flash evangelists took to the wilderness to escape the public Flash-hunt. Others went underground, transitioning to HTML5 and JavaScript, Android or iOS, while hiding their Flash skills deep in their CVs and just occasionally – when they’re sure no-one’s looking – opening up Flash as a little guilty pleasure.

Flash developers who stuck by Flash face the possibility of career skills becoming redundant. You face two options – wait until it’s in demand again (Cobol style!) or reskill now!

I’ll admit my decision a couple of years ago to reskill in Swift wasn’t an easy decision at the time. It felt like I was leaving behind my expertise and starting over.

I have a Flash developer friend Paul, who tells me: “Yeah things are pretty bleak on the Flash front… I am very tempted to get stuck into Swift but have a fear at the back of my head in 5 years time it will become redundant just like happened with Authorware, Director, Flash etc… My other fear is it is too steep a learning curve.”

If you’ve found your way here as a Flash guy, on the run, trying other things and thinking about getting into Swift but perhaps you’re scared, confused, fearful of change, don’t worry, you’re in a safe space. And this is the tutorial for you…

SwiftAPIfortheFlashGuy

In this tutorial, we’re going to port an ActionScript game called “Flashy Bird” to Swift. You can download the Flash source code for Flashy Bird here. Go ahead, download and run it to see what we’re dealing with.

For simplicity and to keep everything feeling as familiar as possible as we move into new territory, we’re going to use a framework I’ve built called “ActionSwift3”. This framework enables you to use some of the familiar AS3 API, but from built on top of what’s called the `SpriteKit` framework, within Swift.

In ActionSwift3 you’ll find familiar classes such as `MovieClip`, `Sprite`, `SimpleButton`, `TextField`, `Sound`, `EventDispatcher`, the list goes on.

In addition to the API, ActionSwift3 has incorporated much of the syntax and data types of ActionScript. For example, you can use ActionScript’s `int`, `Number`, `Boolean`, as they are simply interpreted as Swift datatypes `Int`, `CGFloat` and `Bool`. Similarly, ActionScript’s `trace’ is simply interpreted as Swift’s global function `print`. You can find more info on ActionSwift3 at its github page and API documentation here.

Now, all of this is intended to help make the transition easier for you initially in a familiar environment and I imagine in time you’ll challenge yourself to become familiar with Swift classes, datatype names and approaches, and potentially leave ActionSwift3 behind. But for now, let’s see how easy it is to port an ActionScript project over to Swift.

Create a new project

If you haven’t downloaded Xcode yet, go ahead and do that, you can find it in the App Store. Open up Xcode and familiarize yourself with the interface.

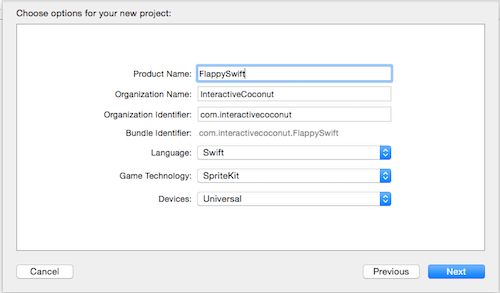
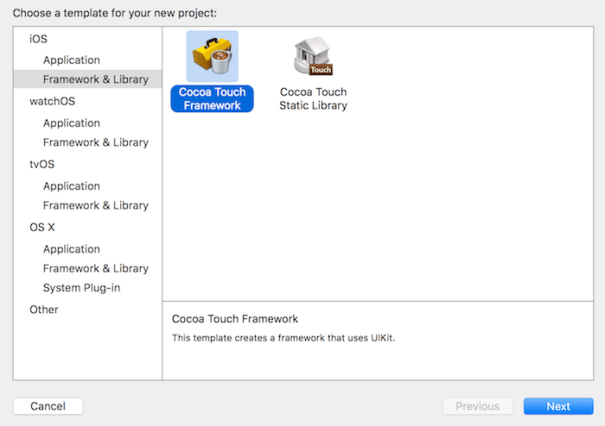
Go to File>New>Project, iOS>Application>Game and fill in the project fields. Be sure to select Swift and SpriteKit, select Next, choose a path, select Next and your project is ready.

createProject

A little housekeeping before we start. The template automatically set up a GameScene.swift and GameScene.sks(sprite kit scene) file. You can go ahead and delete these and select ‘Move to Trash’. Now in the GameViewController file, you can replace everything with a more bare bones approach:

import SpriteKit

class GameViewController: UIViewController {
    override func viewDidLoad() {
        super.viewDidLoad()
    }
    override func shouldAutorotate() -> Bool {
        return false
    }
    override func supportedInterfaceOrientations() -> UIInterfaceOrientationMask {
        return .Portrait
    }
    override func didReceiveMemoryWarning() {
        super.didReceiveMemoryWarning()
        // Release any cached data, images, etc that aren't in use.
    }
    override func prefersStatusBarHidden() -> Bool {
        return true
    }
}

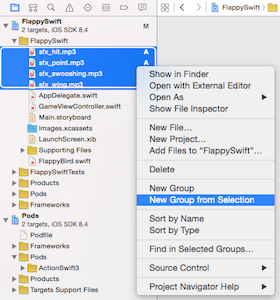
Before we get too deep into coding, quickly set up the same resources used in the Flash file. Here are the resources. Drag the audio files to the `FlappySwift` group, and ensure ‘Copy items if needed’ is checked. Select ‘New Group from Selection’, and purely to keep your files organized, group the audio into a group named ‘Audio’.

new group

Next drag in the ‘images.atlas’ folder into the ‘FlappySwift’ group. This time, this isn’t just for organizational purposes and the folder name isn’t random. Xcode automagically creates a texture atlas for folders with the extension `atlas`, and the `images.atlas` folder is the default texture atlas. Texture atlases are more commonly known as sprite sheets in Flash.

CocoaPods

CocoaPods is a tool for managing third party libraries in your Xcode project. You’re going to use it to import the ActionSwift3 library to the project. Follow the CocoaPods installation instructions here.

Now you have CocoaPods installed, install ActionSwift3:

  1. Close your FlappySwift project in Xcode.
  2. Create a file in your main FlappySwift folder(not the inner folder) called ‘Podfile’, and include the following:
    source 'https://github.com/CocoaPods/Specs.git'
    use_frameworks!
    platform :ios, '8.0'
    pod 'ActionSwift3'
    
  3. From the Finder, drag the whole FlappySwift folder(not the inner folder) to Terminal, and type in `pod install`. Give it a few minutes. In addition to installing ActionSwift3 it’s building what’s called a ‘workspace’ for your project that you will need to open from here-on instead of your ‘project’ file.
  4. That’s it! You should now find a ‘`FlappySwift.xcworkspace` file in your project folder. Open it up.

Now, you’re set to use ActionSwift3!

Find your `GameViewController.swift` file again, and add import ActionSwift3 to the import statements. You might need to rebuild your project again(⌘ B) for Xcode to recognize this module. Now at the bottom of the viewDidLoad method, add let stage = Stage(self.view as! SKView) and you’re ready to start adding children to Stage, ActionSwift3 style!

Have a look at the `GameViewController.swift` in the github example app here, to see what sort of familiar classes are available to you, and how you can build up a simple app in ActionSwift3.

Create a Swift class

Let’s return to Flappy Bird now, to look at building something a little more complex in ActionSwift3.

Start off by creating a Swift file to represent the ‘root’ class, called FlappyBird.swift.

Select File>New>File, CocoaTouch Class(which actually means you’re creating a class that subclasses another class) and Next. Type `FlappyBird` in the Class field, subclass `MovieClip` and Language `Swift`.

Now a skeleton of your FlappyBird class should auto-generate. The first thing you may notice is there are no packages. Everything in a target is assumed to be in the same namespace. As ActionSwift3 is stored in a different target, you’ll want to import this target:

import ActionSwift3

…and that’s it! It’s not necessary(nor possible) to import every class.

Do the same for all six classes of the FlappyBird game.

Convert code

Now to convert your code across from ActionScript. Now, much of ActionScript syntax has been ported into ActionSwift3, but there are obviously some obvious differences remain:

  • ; The semi-colon is gone in Swift! In fact, it’s just ignored. You can choose to leave them in, but it’s probably a good idea to start training yourself to leave them out.
  • new The `new` keyword is not necessary to instantiate a class.
  • function->func This is abbreviated as `func` in Swift.
  • this->self `this` is called `self` in Swift.

I would suggest that you perform a find and replace on these syntactic differences before copying over code from ActionScript.

More differences require some finesse, here are some to be wary of:

  • const Constants in Swift are defined with `let`.
  • extends In Swift classes are subclassed using a colon rather than the keyword ‘extends’
  • init The constructor of a class in Swift is called the initializer. Replace your constructors with just the keyword `init`.
  • strict typing Swift is a type-safe language, meaning that variables must strictly adhere to their data type definition. This even excludes the value of nil – variables must be initialized by the end of the initializer method, or the superclass’s initializer method. (this can take some mental adjustment.)
  • optionals How can a variable contain nil then, I hear you ask – this is achieved through a special datatype called an Optional. An Optional is indicated by a question mark (?) after the definition of the variable.
  • non-implicit type conversion You’ll find when performing arithmetic between integers and floating point numbers. Leading on from its strict typing philosophy, you’ll need to explicitly convert a data type to be able to perform arithmetic between different data types.
  • brackets in if statements In if statements in Swift, round brackets surrounding the condition are optional, and curly brackets around the code block are mandatory(no implicit single line code blocks).
  • Return values of functions Are specified with `->` instead of a colon `:`.
  • for-loops The c-style for-loop is no longer. Instead, either use a for-in loop looping over every element of an array:
var names = ["Craig","Jemaine","Bret"]
for name in names {
  trace(name)
}

Or, if it’s necessary to loop over a range of values, you can instead use a special type called a range:

for i in 0...3 {
  trace(i)
}
  • RIP ++ You can no longer increment or decrement a value with the ++ or — operators. Replace these in your code with the clearer +=1 or -=1 operators.
  • function parameters Whereas in Flash parameters are identified by the order they’re in and have no external name, the default in Swift is that parameters have an external name. Example in Flash:
var array:Array = ["a","b","c","c","e"];
array.splice(3,1,"d");
trace(array); 	//a,b,c,d,e

In ActionSwift3, it’s actually much clearer what’s going on:

var array = ["a","b","c","c","e"]
array.splice(3,deleteCount:1,values:"d")
trace(array) //a,b,c,d,e

You may have noticed the first parameter of splice doesn’t have a parameter name – there is a way in Swift to prevent an obligatory parameter name if it makes more sense, with an underscore before the parameter name in the function definition. eg:

func distanceTo(_ x:Int, _ y:Int)
…
distanceTo(0,10)

ActionSwift3 uses a combination of the Swift and ActionScript approaches. You can read more about function parameters in Swift here.

Well you’ve just skimmed the surface of some technical differences between Swift and ActionScript. If you’d like to know about some more philosophical differences between the two languages, click here.

Feel free to work through the .as files, converting to Swift as you go. In most cases it’s just a case of slight tweaks to syntax. Or – using the magic of github, here’s one I prepared earlier. You’ll need to run `pod install` to install ActionSwift into the project.

So that’s it Flash guy, you’re on your way to becoming a Swift guy.

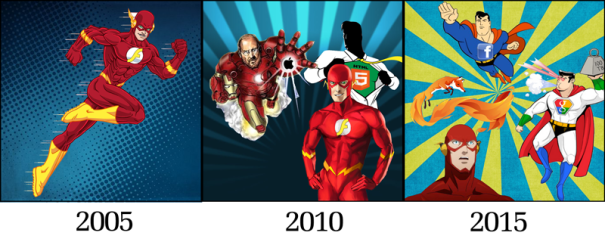
And Paul, it might be time to update that old superhero costume!

swift

Tagged with: ,
Posted in Flash, Swift

Best practices differences between Swift and ActionScript3

There are the obvious technical differences in Swift compared to other languages such as ActionScript – optionals, strict data typing, namespacing, syntax, etc. What I find interesting though is where there aren’t technical differences, but there are differences in approach, philosophy and best practices. It’s interesting to watch these best practices philosophies in different programming communities evolve. Here are a few I’ve noticed:

this – self
Despite both languages having a keyword for classes to reference themselves explicitly(avoiding conflict with local variables), when to use them has shifted. In ActionScript most folks recommended always using `this` if possible(link). In Swift, the consensus is generally to avoid using `self` where possible(link) Explicitly naming `this` in Flash was partially required for code hinting.

Constant naming
In ActionScript, the consensus was to name constants all capitals with underscores to mark spaces(link). In Swift, constants are more ubiquitous so share camel case convention with variables. (link)

Type definitions
In Swift, as it is a type-safe language, the preference is to infer type from its contents rather than specify it, if possible. (link) In ActionScript, it’s possible to set a variable without explicitly specifying the datatype, however this variable would not be strongly typed, which is probably why in ActionScript the recommendation is generally to always specify your variables’ data types. (link)

Semi colons
Both languages actually are agnostic about whether lines of code are terminated by a semi-colon. While the recommendation in ActionScript is to use semi-colons, recommendations in Swift is to avoid semi-colons.

Have I missed any? Are they other interesting differences in best practices with other languages?

Tagged with:
Posted in Flash, Swift

Ambiguous convenience initializers

I was just setting up a class with a designated initializer and a convenience initializer to be able to pass in initializing properties beyond the defaults:

class Font {
    var name = "Arial"
    var size = 12
    init() {

    }
    convenience init(name:String,size:Int) {
        self.init()
        self.name = name
        self.size = size
    }
}

Great, all good so far. But sometimes a Font will be instantiated with a different name, but we want to leave the size as the default(or vice versa). Let’s add a default value to the name and size parameters in the convenience initializer:

convenience init(name:String="Arial",size:Int=12) {

Oh. You’ll see the obscure error on `self.init()`:
> Could not find an overload for ‘init’ that accepts the supplied arguments

What’s going on here? The error message isn’t very clear. If you comment out the offending line in the convenience initializer, and try to instantiate the class, you get a better idea of the problem:

Screenshot 2015-08-03 10.38.06

Two initializers without parameters appear for the Font class. How does the compiler know which initializer you intend it to run with the following line?

var font = Font()

If you instantiate Font without parameters, you’ll see the error:
> Cannot invoke initializer for type ‘Font’ with no arguments”.

Still not a very clear error message, but you’ll probably be starting to get the idea why. You’ll see a much clearer error message if you set up two functions with the same name, one with a parameter with a default value:

class Planet {
    var name = "World"
    func greet()->String {
        return "Hello \(name)"
    }
    
    func greet(name:String = "World")->String {
        self.name = name
        return "Hello \(name)"
    }
}
var planet = Planet()
planet.greet()

This time, you’ll see the error message:
> Ambiguous use of ‘greet’

Short and sweet, but I think it gets the point across much more clearly – ambiguity is the issue!

So stepping back a second – what’s a convenience initializer for? Supporting the designating initializer. But is a convenience initializer necessary if all of the parameters have default values? No!

class Font {
    var name = "Arial"
    var size = 12

    init(name:String="Arial",size:Int=12) {
        self.name = name
        self.size = size
    }
}
var arial = Font()
arial.name
arial.size

var comicSans = Font(name: "ComicSans", size: 10)
comicSans.name
comicSans.size

var times = Font(name: "Times")
times.name
times.size

var bigArial = Font(size: 48)
bigArial.name
bigArial.size
Tagged with: ,
Posted in Swift

Parameter defaults and Optional Function Parameters in Swift 2.0

This post has been updated for Swift 3.0 here.

This post has been updated for Swift 3.0 here.

There are some changes in Swift 2.0 to Optional Function parameters, so I thought I should revisit this blog post.

For info just on function parameters in Swift 2.0, click on my post here.

Swift has an interesting multi-pronged approach to dealing with default and optional function parameters, based in part on its relationship with Objective C and part inspired by other approaches.
It’s worth exploring the options.

Optional function parameters approach 1

First of all, let’s look at one approach to optional parameters:

func printFirstName(firstName:String) {
    print(firstName)
}
func printFirstName(firstName:String,surname:String) {
    print("\(firstName) \(surname)")
}
printFirstName("Joe") //prints Joe
printFirstName("Joe", surname: "Blow") //prints Joe Blow

Wait – there are two functions with the same name? And why is the second function called printFirstName, when it clearly has a parameter called ‘surname’?
Well this is the same approach Objective C took, where the function wasn’t just defined by its name, but its parameters as well. So we have two functions – one is ‘printFirstName(firstName)’ and the other is printFirstName(firstName,surname)

Parameters with default values approach 1

This technique can also be a way to define default parameters, where the function with less parameters can call the function with extra parameters, defining defaults.

func printFirstName(firstName:String) {
    printFirstName(firstName,surname: "Smith")
}
func printFirstName(firstName:String,surname:String) {
    print("\(firstName) \(surname)")
}

printFirstName("Joe")    //prints Joe Smith
printFirstName("Joe", surname: "Blow")    //prints Joe Blow

This technique of optional parameters is consistent with the approach Objective C took and was necessary to include in Swift to be able to interpret underlying Objective C code. (I discussed optional parameters in Objective C in a previous blog post here).

Optional function parameters approach 2

As Swift has an Optional variable type, making a parameter Optional, would obviously make it optional 😉 However this doesn’t mean you don’t need to pass anything – you still need to pass nil, and deal with checking the optional contains something in the function.

func printFirstName(firstName:String,surname:String?) {
    if let surname = surname {
        print("\(firstName) \(surname)")
    } else {
        print(firstName)
    }

}
printFirstName("Joe", surname: nil)    //prints Joe
printFirstName("Joe", surname: "Blow")    //prints Joe Blow

Parameters with default values approach 2

Somewhere along the beta line, the Swift engineers made the brilliant decision to introduce true default values for parameters. Parameters with default values have a few special attributes:

  • to be called in a different order, they need to be declared after any parameters without default values
  • These parameters with defaults can be left out when calling the function
  • If external parameter names are included (the second parameter onwards have external parameter names by default) parameters can be included in any order!

Note: In this example the first parameter specifies an external parameter name so as to be able to called out of order.

func printName(firstName firstName:String="Joe",middleName:String="Andrew",surname:String="Blow") {
    print("\(firstName) \(middleName) \(surname)")
}
printName(firstName: "John", middleName: "Juan", surname: "Smith")    //prints John Juan Smith
printName(firstName: "John")    //middleName and surname parameters left out! prints John Andrew Blow
printName()        //prints all defaults (Joe Andrew Smith)
printName(surname: "Smith", middleName: "Julius", firstName: "John")   //parameters out of order! prints John Julius Smith

Optional function parameters approach 3

Which of course makes it possible for an ‘Optional’ variable to have a nil default value. So with a simple tweak to our previous default values example, we can introduce a true optional parameter, using the Optional type.

func printFirstName(firstName:String,surname:String?=nil) {
    if let surname = surname {
        print("\(firstName) \(surname)")
    } else {
        print(firstName)
    }

}
printFirstName("Joe")    //prints Joe
printFirstName("Joe", surname: "Blow")    //prints Joe Blow

Be careful with naming conflicts mixing these approaches – if you have multiple functions with the same name but different parameters, and one of them has optional parameters, and there’s a possibility that Swift won’t know which function you’re referring to, there’s a naming conflict and the compiler will complain.

Good luck with your Swift functions, hopefully this has been helpful – let us know in comments any other function parameter tips. Swift 2.0 seems to be more forgiving and flexible and allow for some interesting combinations of functions with/without external parameter names and with/without default values.

For info just on function parameters in Swift 2.0, click on my post here.

Tagged with: , ,
Posted in Swift

Func parameters in Swift 2.0

This post has been updated for Swift 3.0 here.

This week func parameters were simplified in Swift 2.0. The hash symbol was deprecated for specifying a parameter should be explicitly named, and the rules were simplified concerning global functions vs class methods. Here’s the new state of play:

1. init methods

Init methods require ALL parameter names to be explicit when instantiating an object:

class Person {
    init(firstName:String,surname:String) {
        (firstName,surname)
    }
}
var person = Person(firstName: "Tim", surname: "Cook")

external parameter name

The same parameter can of course have a different name externally and internally. This could be useful if different names make more sense depending on the perspective, or even for different human languages – perhaps the developer speaks a different language to the user of the class. The external parameter name comes first.

class Person {
    init(firstName 名字:String,surname 姓:String) {
        (名字,姓)
    }
}
var person = Person(firstName: "Tim", surname: "Cook")

implicit external parameter name

If for some reason you want your external parameter names to be implicit, you can use this external parameter name construct, and represent them with underscores:

class Person {
    init(_ firstName:String,_ surname:String) {
        (firstName,surname)
    }
}
var person = Person("Tim", "Cook")

2. Global functions / class methods

Global functions and class methods now work the same, and this should look familiar to Objective C developers. The first parameter has NO external parameter name by default, but following parameters HAVE external names by default. For this reason the first parameter name is often recommended to be incorporated into the method/func name following the word ‘With’.

func getRectAreaWithWidth(width:Double,height:Double)->Double {
    return width * height
}
getRectAreaWithWidth(10, height: 10)

For the second,third etc parameters, you can of course implement alternative external parameter names, or implicit external parameter names as described above.

force external parameter name

If you want to force your first parameter to have an external name, you need to use the same external parameter construct, and just repeat it:

func getRectArea(width width:Double,height:Double)->Double {
    return width * height
}
getRectArea(width: 10, height: 10)
Tagged with:
Posted in Swift